
AWS IoT with ESP32: A Lesson in Spite Driven Development
Click here to get to business.
Earlier this week I was having a chat with an AWS Architect I work with. He was talking about some of the things he’s done with a WiFi enabled Arduino. In turn I mentioned some of the sensors I picked up with the intention of getting them connected to AWS’s IoT Core service. During this discussion I may have mentioned that I’ve become a bit lazy with my personal projects and that it was probably gonna take me a while to actually get anything set up. Now, while his reaction probably didn’t have any ill intentions, it miffed me a little. So this weekend I got off my ass, pulled out an ESP32 board, and attempted to get it hooked up to IoT Core.
This didn’t go well.
I ended up having a bit more difficulty that I’d like to admit. First up, you need to determine what board you have. I grabbed the ESP32 board package from Esppresif, but then had to figure out what the Duinotech ESP32 Main Board was based off. It’s the ESP32 Dev Module by the way. Once I confirmed I was able to program the device, I ran a couple of the included examples to confirm I was able to connect to my WiFi.
With the device connected to the WiFi, I went looking for a pre-existing example of connecting it to AWS IoT. Naturally, the first result in Google was from AWS’s own blog. Following through the start of this tutorial I was able to manually set up IoT Core and get the ESP32 sending and receiving messages. However, as I’ve said previously “manual’s for chumps.” The next move was to get everything set up via Terraform.
Handling the certificate creation was a bit of an issue. I could either do it manually and reference the ARN as a Terraform
variable, or I could just have Terraform create it. Having Terraform create it would require exporting the private key as
an output, and ultimately you couldn’t trust the state to be secure. I ended up going this route as it meant I could have
Terraform create the secrets.h file. We simply take in the WiFi details as variables and pull the root CA certificate from
the internet.
Now, while the Terraform config would deploy correctly and I’d end up with an Arduino project that’d compile and burn, the
ultimate outcome was that nothing was being written or read from IoT Core. After comparing the AWS infrasture to what was built
manually, and even opening up the policy on the certificate, I still couldn’t get it working. So I copied the secrets.h from
the working project into my new one to test, and was able to send and receive messages. This confirmed that the issue was with
the secrets configuration.
This took way to long to work out. In the end it came down to the URL I was using to connect to IoT Core. Compare
xxxxxxxxxxxxx-ats.iot.ap-southeast-2.amazonaws.com and xxxxxxxxxxxxx.iot.ap-southeast-2.amazonaws.com. I was using the
aws_iot_endpoint Terraform data source to retrieve this URL. When you define the data source, you can set an endpoint_type
variable to configure the type of URL generated. What I was originally using was iot:Data when I needed iot:Data-ATS. I
originally missed the ats in the URL and the iot:Data option is the first one the matched my URL without looking too hard.
So ultimately I didn’t end up completing as much as I wanted. It would’ve been nice to have one node sending data and another receiving it. However, at least I now have a working base to build off of.
The Business Part
First thing we want to do is create our Arduino project. The one I ended up working with is from TechieSMS. I ended up rearchitecting some of it to help with my troubleshooting.
To start off with we want some header stuff
        #include "secrets.h"

        #include <ArduinoJson.h>
        #include <PubSubClient.h>
        #include <WiFi.h>
        #include <WiFiClientSecure.h>

        #include <Blynk.h> # included purely to use it's timer function

        #define AWS_IOT_PUB_TOPIC "example/pub"
        #define AWS_IOT_SUB_TOPIC "example/sub"

        BlynkTimer timer;
        WiFiClientSecure net = WiFiClientSecure();
        PubSubClient client(net);
Next we’re gonna add our function to connect to the WiFi:
        void connectToWiFi() {
          WiFi.mode(WIFI_STA);
          WiFi.begin(WIFI_SSID, WIFI_PASSWORD);

          Serial.print("[CORE] Connecting to WiFi ...");

          while (WiFi.status() != WL_CONNECTED) {
            delay(500);
            Serial.print(".");
          }

          Serial.println(" connected");
        }
We want a function to connect to AWS. We’ll use a certificate to authenticate.
        void connectToIOT() {
          Serial.print("[CORE] Connecting to AWS IOT ...");

          // configure wifi client to use the aws iot device credentials
          net.setCACert(AWS_CERT_CA);
          net.setCertificate(AWS_CERT_CRT);
          net.setPrivateKey(AWS_CERT_PRIVATE);

          // connect to the mqtt broker
          client.setServer(AWS_IOT_ENDPOINT, 8883);
          client.setCallback(messageHandler);

          bool res = client.connect(THING_NAME);
          while (!res) {
            Serial.print(res);
            delay(500);
            res = client.connect(THING_NAME);
          }

          if (!client.connected()) {
            Serial.println(" connection failed");
            return;
          }

          client.subscribe(AWS_IOT_SUB_TOPIC);
          Serial.println(" connected");
        }
We need a callback function to process messages we receive from AWS.
        void messageHandler(char* topic, byte* payload, unsigned int length) {
          Serial.print("[SUB] ");
          Serial.print(topic);
          Serial.print(": ");

          StaticJsonDocument<200> doc;
          deserializeJson(doc, payload);
          serializeJson(doc, Serial);
          Serial.println();
        }
We also want to be able to send messages.
        void sendMessage() {
          StaticJsonDocument<200> doc;
          doc["message"] = "Hello World!";

          char jsonBuffer[512];
          serializeJson(doc, jsonBuffer);

          client.publish(AWS_IOT_PUB_TOPIC, jsonBuffer);
          Serial.print("[PUB] ");
          Serial.print(AWS_IOT_PUB_TOPIC);
          Serial.print(": ");
          Serial.println(jsonBuffer);
        }
And finally the default Arduino functions set up and run the loop.
        void setup() {
          Serial.begin(9600);

          connectToWiFi();
          connectToIOT();

          timer.setInterval(5000l, sendMessage);
        }

        void loop() {
          timer.run();
          client.loop();
        }
With that set up we want to create our secrets template.
        #include <pgmspace.h>

        #define SECRET
        #define THING_NAME "${thing_name}"

        const char WIFI_SSID[]        = "${wifi_ssid}";
        const char WIFI_PASSWORD[]    = "${wifi_password}";
        const char AWS_IOT_ENDPOINT[] = "${iot_endpoint}";

        // Device Certificate
        static const char AWS_CERT_CRT[] PROGMEM = R"KEY(
        ${device_certificate}
        )KEY";

        // Device Private Key
        static const char AWS_CERT_PRIVATE[] PROGMEM = R"KEY(
        ${private_key}
        )KEY";

        // Amazon Root CA 1
        static const char AWS_CERT_CA[] PROGMEM = R"EOF(
        ${ca_cert}
        )EOF";
Now on to the Terraform. First we want some variables for our WiFi credentials.
        variable "wifi_ssid" {
          description = "SSID of the WiFi network to connect the Thing to"
        }

        variable "wifi_password" {
          description = "Password for the WiFi to connect the Thing to"
        }
We need some details about our AWS environment to create ARNs.
        data "aws_region" "current" {}
        data "aws_caller_identity" "current" {}

        data "aws_iot_endpoint" "endpoint" {
          endpoint_type = "iot:Data-ATS"
        }

        data "http" "iot_root_ca_cert" {
          url = "https://www.amazontrust.com/repository/AmazonRootCA1.pem"
        }
A certificate to authenticate our ESP32 with AWS. We’ll attach a policy to this that allows the Thing to read and write from our topics.
        resource "aws_iot_certificate" "pub_sub_example" {
          active = true
        }

        resource "aws_iot_policy" "pub_sub_example" {
          name = "pub_sub_example"
          policy = data.aws_iam_policy_document.pub_sub_example.json
        }

        data "aws_iam_policy_document" "pub_sub_example" {
          statement {
            actions   = ["iot:Connect"]
            resources = ["arn:aws:iot:${data.aws_region.current.name}:${data.aws_caller_identity.current.account_id}:client/${aws_iot_thing.pub_sub_example.name}"]
          }

          statement {
            actions   = ["iot:Subscribe"]
            resources = ["arn:aws:iot:${data.aws_region.current.name}:${data.aws_caller_identity.current.account_id}:topicfilter/example/sub"]
          }

          statement {
            actions   = ["iot:Receive"]
            resources = ["arn:aws:iot:${data.aws_region.current.name}:${data.aws_caller_identity.current.account_id}:topic/example/sub"]
          }

          statement {
            actions   = ["iot:Publish"]
            resources = ["arn:aws:iot:${data.aws_region.current.name}:${data.aws_caller_identity.current.account_id}:topic/example/pub"]
          }
        }

        resource "aws_iot_policy_attachment" "pub_sub_example" {
          policy = aws_iot_policy.pub_sub_example.name
          target = aws_iot_certificate.pub_sub_example.arn
        }
This certificate gets attached to a Thing.
        resource "aws_iot_thing" "pub_sub_example" {
          name = "pub_sub_example"
        }

        resource "aws_iot_thing_principal_attachment" "certificate" {
          principal = aws_iot_certificate.pub_sub_example.arn
          thing     = aws_iot_thing.pub_sub_example.name
        }
And last of all, we want to create our secrets.h file.
        resource "local_file" "secrets" {
          filename = "${path.module}/secrets.h"

          content = templatefile("secrets.h.tpl", {
            thing_name         = aws_iot_thing.pub_sub_example.name,
            wifi_ssid          = var.wifi_ssid,
            wifi_password      = var.wifi_password,
            iot_endpoint       = data.aws_iot_endpoint.endpoint.endpoint_address,
            device_certificate = aws_iot_certificate.pub_sub_example.certificate_pem,
            private_key        = aws_iot_certificate.pub_sub_example.private_key,
            ca_cert            = data.http.iot_root_ca_cert.body
          })
        }
With all that in place, our next move is to deploy the Terraform infrastructure. A simple terraform init and
terraform apply should get this done for you. This will create our secrets.h file used by Arduino.
If you now open the Arduino project in the IDE, you can write it to your device. You’ll need to ensure you have the correct board selected and the required libraries installed.
Once you’ve written to the board, open up the serial console and connect to it. If you reset the board you should see the following.
        17:20:51.601 -> [CORE] Connecting to WiFi ........ connected
        17:20:54.559 -> [CORE] Connecting to AWS IOT ... connected
        17:21:01.971 -> [PUB] example/pub: {"message":"Hello World!"}
        17:21:06.956 -> [PUB] example/pub: {"message":"Hello World!"}
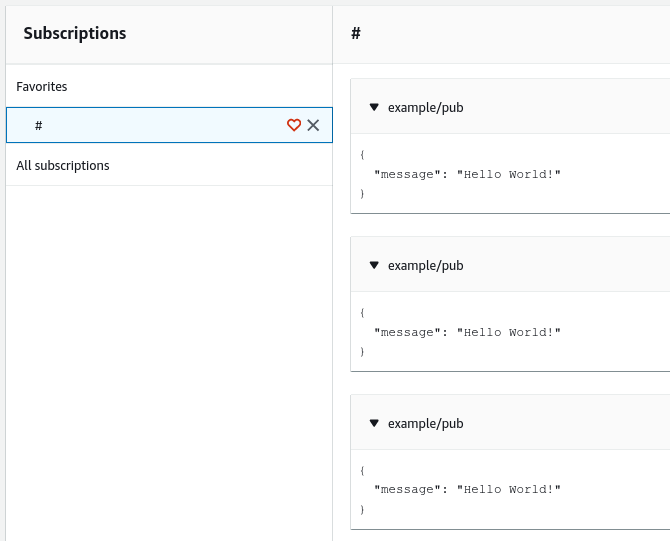
Open up the AWS IoT Test console and
subscribe to the # topic. You should start to see the messages coming in.
Flick over to the publish tab, set the topic as example/sub and click publish. You should see the message show up in the
Arduino serial console.
        17:28:46.976 -> [PUB] example/pub: {"message":"Hello World!"}
        17:28:47.572 -> [SUB] example/sub: {"message":"Hello from AWS IoT console"}
        17:28:51.955 -> [PUB] example/pub: {"message":"Hello World!"}
And with that we’re done here. This was a bit more work that I had anticipated. I’m not as convinced about the ESP32 as I used to be. Maybe an STM32 or something with WiFi, we’ll have to see. I still have that pack of sensors to have a play with.
You can find the source code for this project at GitHub